

How to Bleed Home Radiators Properly: 2026 Guide

Table of Contents
- Why Bleeding Radiators Matters More in Cold Climates
- Signs Your Radiator Needs Bleeding
- Radiator Bleeding Tools: What You Actually Need
- How to Bleed Home Radiators Properly, Step by Step
- How Often to Bleed Radiators (and When to Skip It)
- Boiler Pressure After Bleeding Radiators: What to Check
- When to Stop and Call a Professional
- Frequently Asked Questions
Last Updated: September 18, 2026
Why Bleeding Radiators Matters More in Cold Climates
Trapped air is the most common reason a radiator runs warm at the bottom and cold at the top. When air collects inside the radiator, hot water can’t fill the whole unit. The result is uneven heat, higher energy use, and a system that works harder than it should.
Signs Your Radiator Needs Bleeding
The clearest sign is a radiator that’s hot at the bottom but cold at the top. That temperature split means air is sitting where hot water should be.
Other signs to watch for:
- A hissing, gurgling, or ticking sound when the heat comes on
- Cold spots across the surface of the radiator
- One room that stays cold while the rest of the house is fine
- The radiator takes a long time to warm up
- The system runs more but the house stays cool
Radiator Bleeding Tools: What You Actually Need
You need very little to bleed a radiator. A radiator key is the main tool, and it costs a few dollars at most hardware stores.
Here’s the full list:
- A radiator key for square bleed valves, or a flat-head screwdriver for slotted valves
- A small bowl or cup to catch water
- A rag or old towel to protect the floor and your hands
- Work gloves if the water is still warm
If you don’t have a radiator key, a flat-head screwdriver works on many modern valves. Look at the bleed valve first to see whether it has a square post or a slotted screw. That tells you which tool to grab before you start.
How to Find and Identify Your Bleed Valve
Before you buy anything, find the valve. On most freestanding cast-iron radiators, it sits at the top corner on one end, opposite the pipe connections. On panel radiators, look along the top edge, usually at one end. On baseboard units, check the end caps.
- Square post (the classic radiator key valve). A small square nub sticking out of a round collar. This is the most common style in older homes, and it’s what a standard radiator key is made for.
- Slotted screw. A single straight slot, like a flat-head screw. A flat-head screwdriver fits, but a screwdriver that’s too small can chew up the slot. Use the widest blade that fits.
- Hex or Allen key valve. A small hexagonal recess. You’ll need the correct size Allen wrench, usually metric on imported European radiators.
- Integrated vent with a screw cap. Some modern panel radiators hide the bleed point under a small cap or a plastic cover. Pop the cover off and the valve is underneath.
- Automatic air vent. A small cylindrical fitting, often on the end of the radiator or near the boiler, that releases air on its own. These don’t get bled by hand. If yours has one and the radiator is still cold, the vent itself may be stuck or failed.
What If There’s No Bleed Valve at All?
Some radiators genuinely don’t have one. Older one-pipe steam systems sometimes use a different air vent design, and a few antique units were built without a manual bleed point. If you’ve checked the top corners, the ends, and under any covers and still can’t find a valve, don’t force anything. Poking at the wrong fitting can open a water line under pressure.
A Quick Word on Radiator Keys
Radiator keys are small, cheap, and easy to lose. Many hardware stores and home centers carry them in the plumbing aisle, often sold in multi-packs with a few sizes. If you have more than one radiator style in the house, it’s worth keeping a key on each floor so you’re not hunting for one mid-job. A key that’s too large will round off a square post, so match the size to the valve rather than forcing the closest fit.
How to Bleed Home Radiators Properly, Step by Step
The process is simple, but the order matters. Follow these steps and you’ll avoid most of the common mistakes.
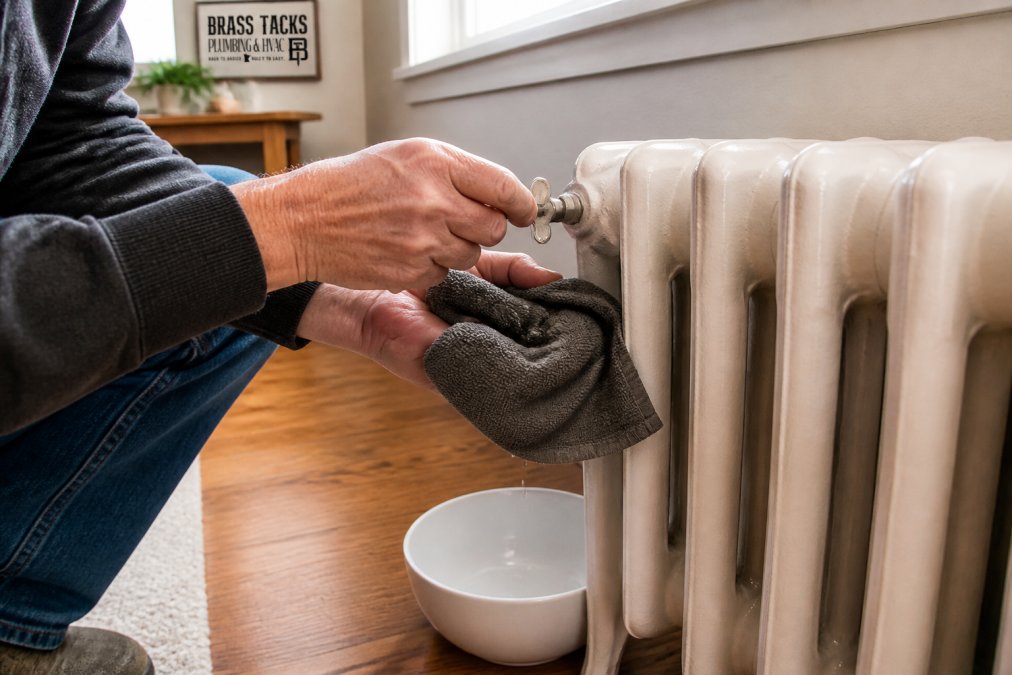
Step 1: Turn Off the Heat and Let the System Cool
Shut off the heating system and wait. Give it 30 to 60 minutes to cool down.
Step 2: Work From the Top of the House Down
Start with the radiators on the highest floor. Air rises, so upper-floor radiators collect it first and often hold the most.
Step 3: Open the Bleed Valve and Catch the Water
Place your bowl under the valve and hold the rag behind it. Turn the radiator key counter-clockwise, slowly, until you hear a hiss.
How Often to Bleed Radiators (and When to Skip It)
Once a year is enough for most homes, ideally before the heating season starts. In Minnesota, that means late September or early October, before you need the heat every night.
Some homes need it more often:
- Systems that pull in air through a faulty seal
- Older radiators with worn valves
- Homes where you hear gurgling soon after bleeding
If you bleed a radiator and the valve won’t stop dripping after you close it, stop and call a pro. A valve that won’t seal can leak steadily and damage floors, ceilings, and the radiator itself.
Boiler Pressure After Bleeding Radiators: What to Check
Bleeding releases water, and that lowers the pressure in your boiler. On a cold system, most residential hot-water boilers are designed to run in a range set by the manufacturer, often somewhere between 12 and 18 psi on the gauge (roughly 1 to 1.5 bar, depending on how your gauge is marked). Check your boiler’s manual or the label on the unit for the target your system was built around.
How to Repressurize a Low Boiler
- Let the system cool first. Pressure readings on a hot boiler are misleading. Wait until the system has been off long enough to reach room temperature.
- Find the fill valve or fill loop. On most residential boilers, it’s a small valve on a braided hose or hard pipe connecting the cold water supply to the boiler. Some are manual, some are a lever you hold open.
- Open it slowly. Watch the gauge as you go. You’re aiming for the cold-fill target in your manual, not the top of the range.
- Close it fully when you hit the target. A fill valve left partly open can overpressurize the system once the water heats and expands.
- Run the heat and recheck. After the system has run a full cycle, look at the gauge again. A small rise is normal. A big rise, or pressure that climbs toward the relief valve setting, means something needs attention.
If your boiler has an automatic fill valve, it may top itself up. Don’t assume it will. Many automatic fillers are set to maintain a minimum, not to restore normal operating pressure after a bleed. Check the gauge either way.
Why Low Pressure Matters More in a Cold Climate
A boiler that drops below its minimum pressure can lock out on a safety switch and refuse to fire. In a Minnesota January, that’s not a minor inconvenience. It’s a no-heat call, and if it happens overnight during a cold snap, pipes in exterior walls can be at risk before morning.
What If Pressure Keeps Dropping?
If you see any of these, stop refilling and have the system looked at:
- Pressure drops again within a day or two of refilling
- Water stains, drips, or corrosion near the boiler or radiators
- The relief valve discharges water
- The gauge reads high after the system heats up
After bleeding, always check the boiler pressure gauge once the system is cool. Low pressure from released water is the most common post-bleeding problem, and knowing your system’s cold-fill target is what makes the fix quick instead of guesswork.
If you’re not comfortable working with the fill valve, or if your boiler uses a sealed system with no accessible fill loop, that’s a normal point to call for help. Brass Tacks Plumbing handles heating and cooling services across the West Metro, and our licensed technicians can check pressure, look for leaks, and get the system back to where it should be before the next cold snap.
When to Stop and Call a Professional
Call a pro if bleeding doesn’t fix the cold spots, if a valve leaks, or if pressure keeps dropping. Those point to bigger issues than trapped air.
Watch for these signs:
- A radiator that stays cold even after bleeding
- Water that won’t stop coming from the valve
- Boiler pressure that falls again after you refill it
- No bleed valve visible on the radiator at all
- Rust-colored or dirty water coming out
Frequently Asked Questions
Should I start bleeding radiators at the top or bottom of the house?
Start at the top floor and work your way down. Air rises, so upper-floor radiators collect the most trapped air. Bleeding those first lets air escape before it settles lower. If you start in the basement, loosened air can push upward and undo your work. In two-story West Metro homes, begin with bedrooms and bathrooms upstairs, then move to main-floor living spaces. Bleed one radiator at a time, close the valve fully, and check the next.
What tools do I need to bleed a radiator?
You need a radiator key (available at most hardware stores), a rag, and a small catchment bowl or cup. A flathead screwdriver works if your valve has a slot instead of a square stem. For older systems, keep a towel handy in case water sprays wider than expected. That is the entire radiator bleeding tools list for a standard job. If your radiators have no visible bleed valve, stop and call a professional rather than guessing.
Should I bleed radiators with the heating on or off?
Turn the heat off and let the system cool for at least 30 minutes before bleeding. Hot water under pressure can scald you, and a running circulator pump keeps pushing water through the system while you work. Bleeding a cool system also gives you a clearer read on boiler pressure afterward. Once every radiator is bled and the valves are closed, restart the heat and check for even warmth across each unit.
Do I need to bleed all my radiators if I only bleed one?
Not always, but it is worth checking each one. Air often collects in more than one radiator, especially in homes with long pipe runs or upper floors. If one radiator was cold and the rest heat evenly, bleeding just that unit may solve it. If several rooms feel cool, bleed each radiator one at a time and watch boiler pressure after bleeding radiators. In Minnesota homes that sit unused or have zones shut off, air pockets tend to build up in multiple spots.
Bleeding your radiators is one of the easiest ways to keep your home warm through a Minnesota winter. When trapped air, low boiler pressure, or a stubborn valve turns a simple job into a bigger problem, it helps to have someone who knows these systems. Brass Tacks Plumbing offers honest recommendations, upfront pricing, and licensed technicians who respect your home. Schedule your heating service now and get your system running the way it should.
